Deploying Astro on DigitalOcean (or any other VPS) thro Gitlab CI

Only part that differs between VPS providers is their GUI for provisioning servers. Once box is provisioned and you are SSH'd into it, it's all the same. :)
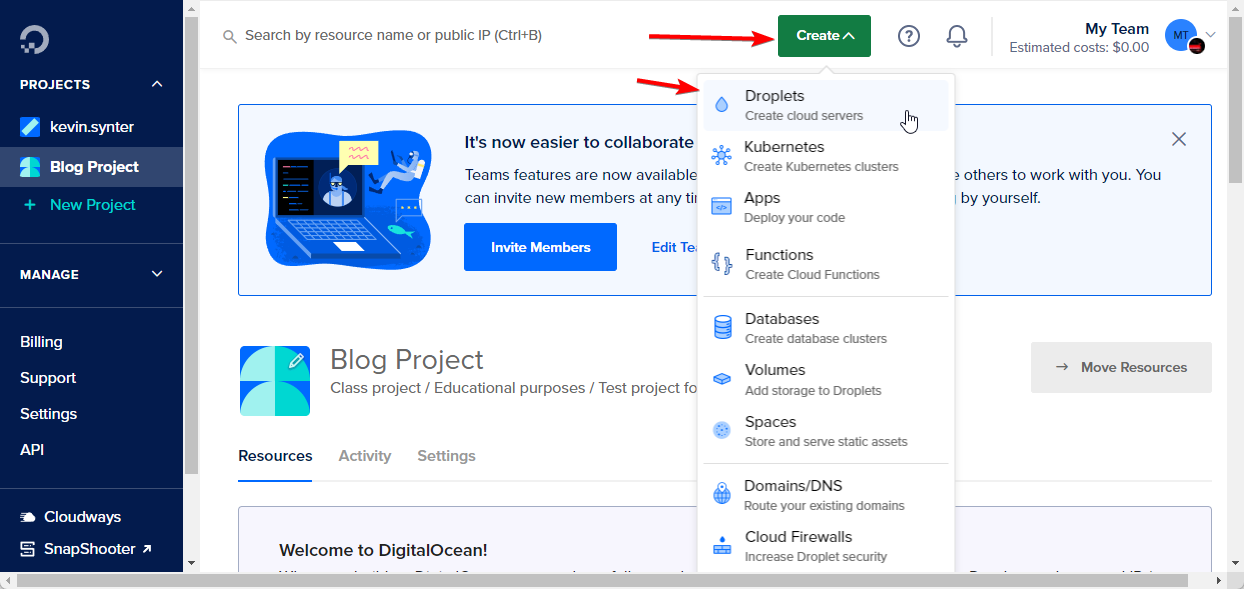
Provision a server in DigitalOcean
First, we need to provision a server. DigitalOcean refers to them as "Droplets". Going to create one.
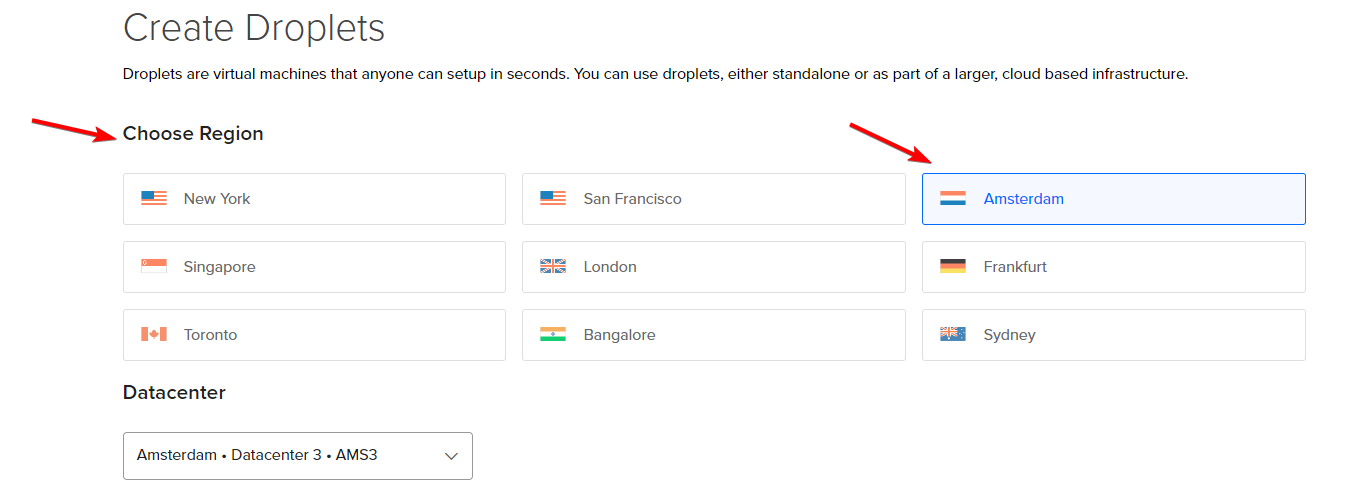
Select the region that is closest to your users. For me, it's Mid-Europe, so both Frankfurt and Amsterdam would be OK.
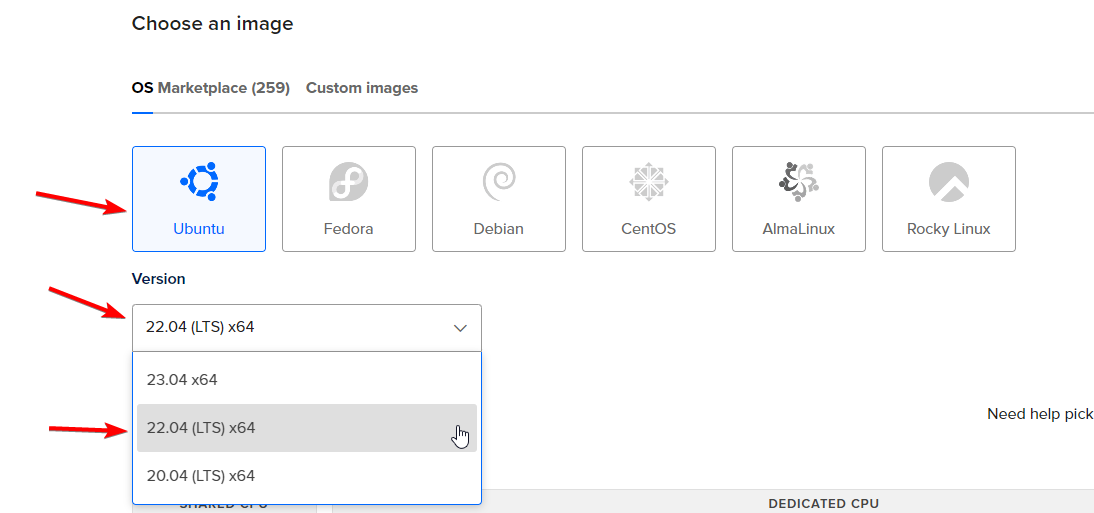
Pick Linux OS you are most familiar with. Generally, it's beneficial to use the same OS on the server that you (or anyone on your team) uses as a daily driver. Personally, I'm huge fan of OpenSUSE, but for this tutorial, I'll go with Ubuntu, since that's what most people use. For servers it's good to use LTS (long-term support) version, as LTS versions are more stable.
Now, it's time to pick the "Droplet Type", which depends on your needs.
"Basic" comes with a shared CPU, meaning that if someone else is running heavy compute on the same hardware, your application's performance is taking a hit too, since physical CPU cores are shared between virtual servers.
Every other type has dedicated virtual specs, meaning that there will be no noisy neighbours. Compare their stats to determine what you most need: CPU, RAM, Storage, or just a general-purpose server.
I'm going with 1GB RAM and 1 shared CPU. Since this is just for the tutorial, I'm not expecting any load on it. Most personal blogs and projects can run on this. You can always upscale your server later (make sure to check server scaling options with your VPS provider. Not all offer it as a 1-click feature).
Running Astro itself consumes ~100MB of RAM and quite a little CPU. However, when building Astro with npm run build, it can consume gigabytes of RAM and all the CPU. My builds became flaky with less than 1GB of RAM, often getting OOMkilled (out-of-memory).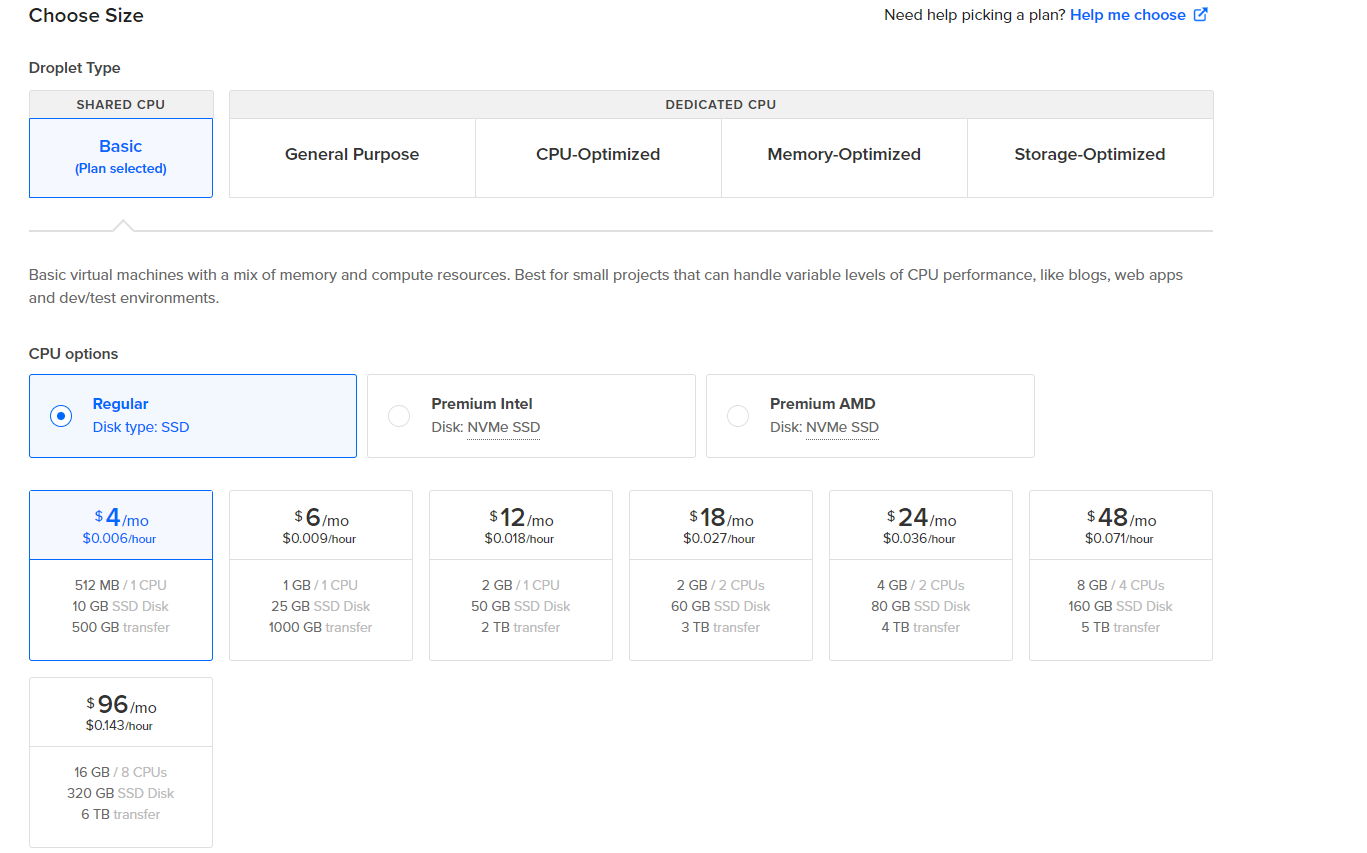
Now, it's time to choose an authentication method. For security, it's always better to use an SSH key rather than a username and password. Someone could potentially guess your server password and take full control of it. Guessing SSH keys is almost impossible. If you already have a PUBLIC key uploaded to DigitalOcean, simply select that one. If not, you'll need to upload your PUBLIC key.
(edit: just today [05.11.2023] read the news, that someone claimed they can use quantum computer to guess RSA-2048 SSH keys, so there goes that.)
To get your public key, check the home folder on your computer. It should contain a .ssh folder. From there, copy the contents of the id_rsa.pub file (the filename might differ, but it should end with .pub, denoting it's a public key).
Click "Add SSH Key" in DigitalOcean
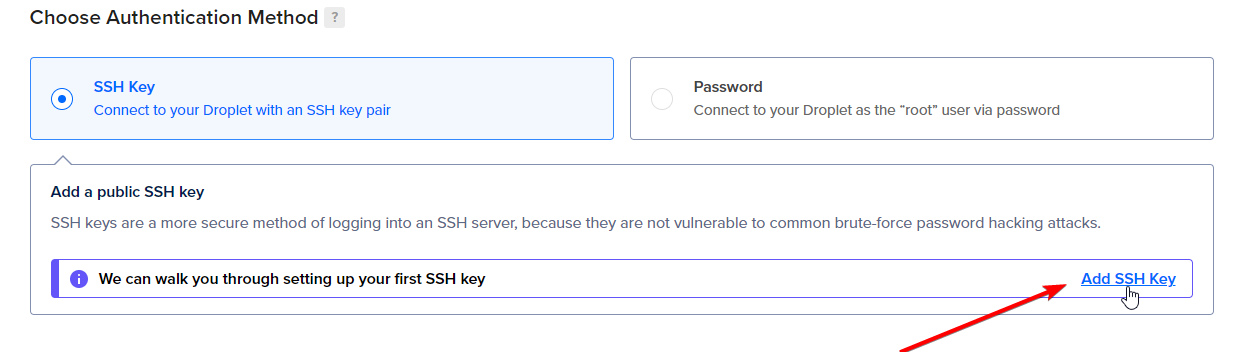
Paste the contents of the id_rsa.pub into the dialog that pops up, give it a name and click "Add SSH Key".

If you don't have SSH key, then DigitalOcean will walk you thro how to make one on the right side of that modal.
Never upload your PRIVATE key, it's private!
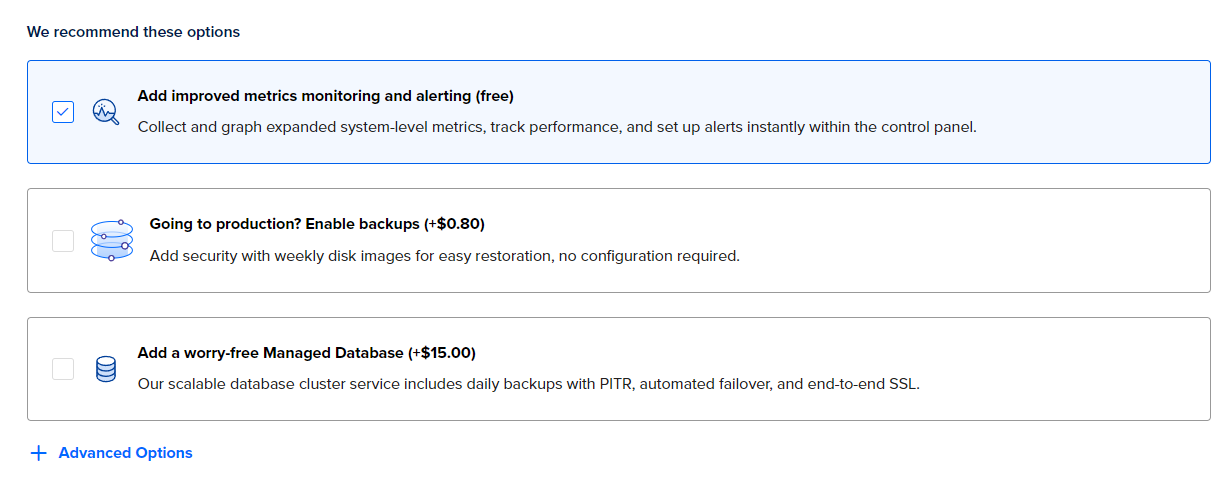
Select whatever you need from the "Recommended" section. Might want to enable backups in prod. I'd also recommend to add monitoring since it's free. If you're running your own monitoring through Prometheus or something similar, then there's no real point in enabling it.
Optionally, you can create more than one server, assign it a custom hostname, and add tags.
I like to give hostnames based on what they actually run, so I don't end up with a pile of random names.
It's also nice to add some tags like "dev", "test", "prod", "safe-to-delete", "temp", "cache", "proxy", "whatever". However you want to tag them. It just makes life easier in the future if, two years later, you have 30 servers running and you're wondering which ones are in use and for what.
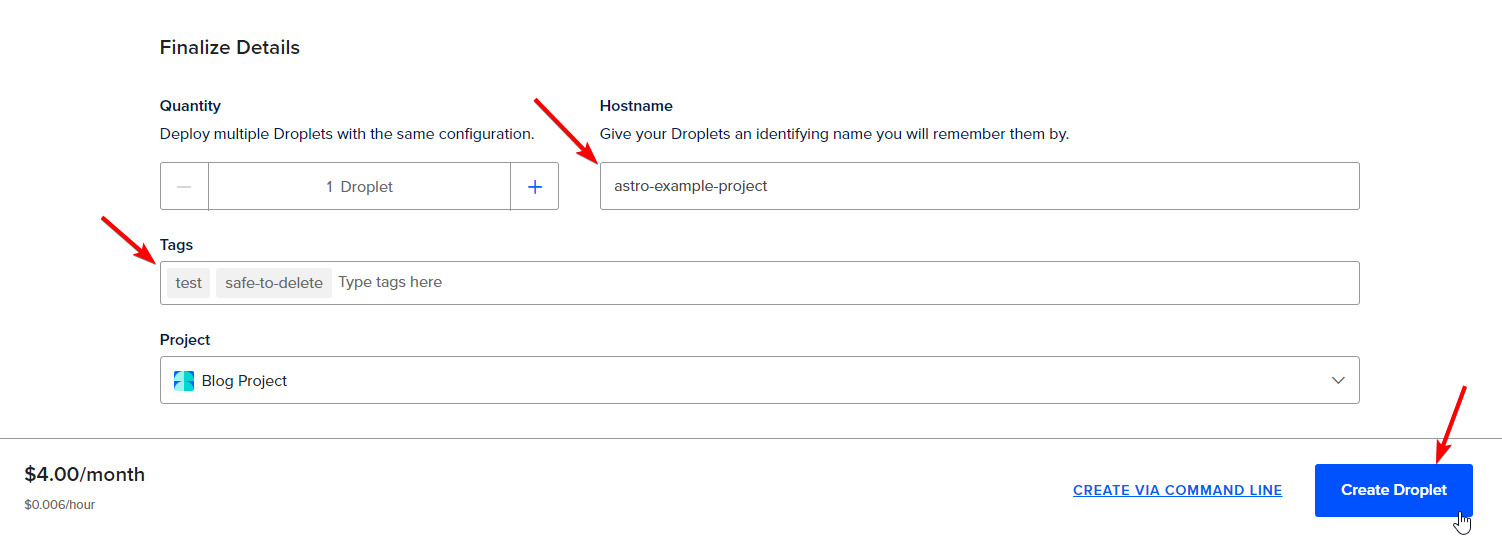
After clicking "Create Droplet", you can go to "Droplets" from the left sidebar. You should see that your server is being provisioned (or is already up and running).
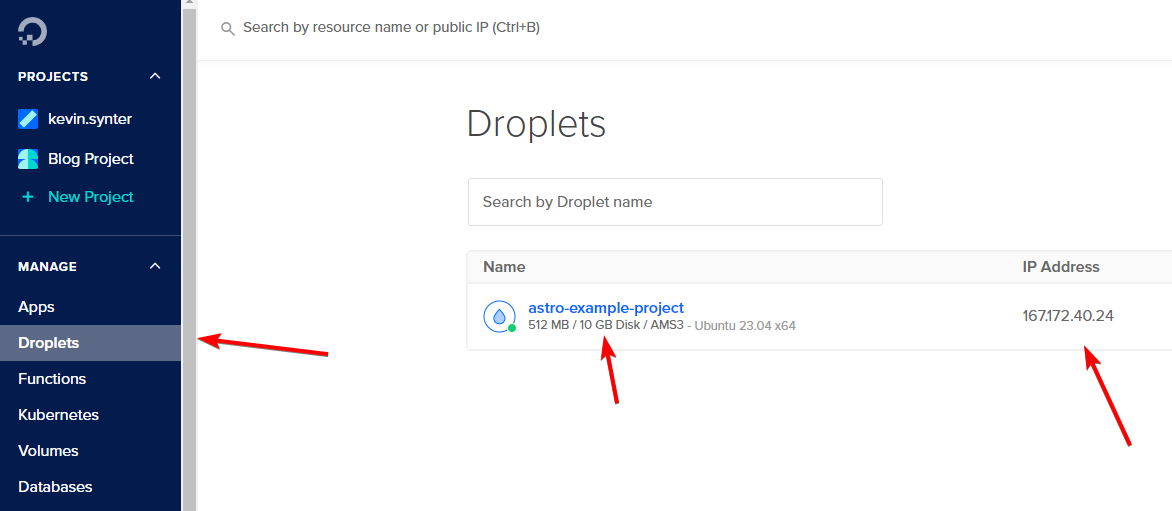
When server shows up in there with IP address, you can finally SSH into the server and start setting it up. From this point on, it doesn't matter which VPS provider you're using. The only thing that matters, is the operating system.
To SSH into the server, use the ssh command: ssh USER@IP. In picture above it's ssh [email protected]
Server setup
For simplicity, going to use Caddy server, acting as a reverse proxy to Node process which runs Astro framework, managed by PM2. Here are the steps we will follow on the server:
- Install the latest OS updates
- Set up non-root user
- Make SSH a bit more secure
- Create a "deployer" user
- Install Node with NVM (Node Version Manager)
- Install PM2
- Set up GitLab deployment
- Configure PM2
- Install and configure Caddy
- Point DNS record to server
- Check if everything works
Starting with OS updates on Ubuntu:
Update package repositories
apt updateUpdate packages
apt upgrade -yS will yell at you if it wants to do restart, in case of Kernel updates. You can actually reload Kernel without downtime, but at this point, it's just easier to restart whole server. Nothing is running on it anyway.
I've noticed that snapd had some random spikes when it used 40-60% of the CPU on a fresh server. Since we won't be using it, I've turned it off and disabled it
systemctl stop snapd && sudo systemctl disable snapdMaybe it's running some self-updates or analytics from time to time. ¯\_(ツ)_/¯
Make non-root user
A lot of bots try to do SSH login with root@YOU_SERVER_IP and guess server password. That's why it's good idea to disable root login and make your own user
First, we'll create a new user with adduser. Going to create a user "mcsneaky".
adduser mcsneakyThis will ask as buncch of stuff. Password, room number, address and what not. You only need to set the password and can leave the rest of the fields blank. At the end, confirm the information with y.
Note: When typing the password, no characters will appear on the screen for security reasons.
root@astro-example-project:~# adduser mcsneaky
Adding user `mcsneaky' ...
Adding new group `mcsneaky' (1000) ...
Adding new user `mcsneaky' (1000) with group `mcsneaky (1000)' ...
Creating home directory `/home/mcsneaky' ...
Copying files from `/etc/skel' ...
New password:
Retype new password:
passwd: password updated successfully
Changing the user information for mcsneaky
Enter the new value, or press ENTER for the default
        Full Name []:
        Room Number []:
        Work Phone []:
        Home Phone []:
        Other []:
Is the information correct? [Y/n] y
Adding new user `mcsneaky' to supplemental / extra groups `users' ...
Adding user `mcsneaky' to group `users' ...
Now, when the new user is created, we need to grant it sudo permissions. We can add the user to the sudo group with usermod.
usermod -aG sudo mcsneakyusermod is the command to modify a user
-a is for appending the user to the specified group
-G stands for adding group to user
sudo is the group name
mcsneaky is the user name whose groups to modify
To test if everything is set up correctly, we'll switch to the new user "mcsneaky".
su - mcsneakyRun any sudo command, which should ask you for password
sudo ls /root[sudo] password for mcsneaky:
snapNow, if everything works good, we also need to transfer SSH public key to new user. One option for that would be to use ssh-copy-id from local computer, but since password auth is off by default, we can't do it. Need to add it manually.
Since we know root user already uses same key, we can copy it from root user home dir.
First, going to create .ssh folder in new user home.
mkdir ~/.ssh.ssh folder requires right permissions, so only given user can modify it and not everyone.
chmod 700 ~/.sshchmod is the command to change permissions of files and folders
700 is permission level we want to have. It means that user itself can read, write and execute anything in it, but it's not readable for others
~/.ssh is the folder we want to change permissions for
Now, we also need to transfer over authorized_keys from root user. To switch back to the root from current "mcsneaky" session, simply type exit.
mcsneaky@astro-example-project:~$ exit
logout
root@astro-example-project:~#
Copy the root user authorized_keys file to new user .ssh directory.
cp /root/.ssh/authorized_keys /home/mcsneaky/.ssh/Since we copied it from root user, mcsneaky won't have access to it. We can check to who this file belongs with ls -lah
root@astro-example-project:~# ls -lah /home/mcsneaky/.ssh/authorized_keys
-rw------- 1 root root 741 Oct 15 09:50 /home/mcsneaky/.ssh/authorized_keys
From it we can see, that file belongs to user root with group root. Need it to be user mcsneaky and group mcsneaky. That can be changed with chown, which is command to change file and folder ownership.
chown mcsneaky:mcsneaky /home/mcsneaky/.ssh/authorized_keysNow, should be able to login as mcsneaky to the server. Exit from current SSH connetion with exit or open new terminal and run ssh NEW_USER@YOUR_SERVER_IP and you should be able to login.
From now on will assume that all commands are run under new user.
Configure SSH to be lil bit more secure
Open /etc/ssh/sshd_config with any text editor in server. I like to use Vim, but many like to use Nano. Since it's system service, you need to edit it's config with elevated permissions - sudo.
sudo vim /etc/ssh/sshd_configWe want to change pile of settings in there .
PermitRootLogin no # set to no to disable direct root logins
PubkeyAuthentication yes # to allow login with keypair
PasswordAuthentication no # to disable password login
PermitEmptyPasswords no # to disable empty passwords
KbdInteractiveAuthentication no # to disable KBM auth
KerberosAuthentication no # to disable Kerberos auth
GSSAPIAuthentication no # to disable GSS auth
UsePAM no # we can disable it, since we won't use PAM
X11Forwarding no # we won't be running any graphical interface, won't need to forward it
This will do for now. Save the file and validate SSH config with.
sudo sshd -tIf everything is OK, then there will be no output. Otherwise there will be errors.
In case everything is good, reload ssh service.
sudo systemctl reload ssh.serviceWe can confirm everything working as intended when we try to SSH to server as root again. Should get error like this.
root@YOUR_SERVER_IP: Permission denied (publickey).Now, we'll use that new user to manage server, but we need user with with limited permissions to manage code deployments.
Creating "deployer" user
It's basically the same as creating "mcsneaky" user, we just won't add it to sudo group.
sudo adduser deployerFill in the password and leave everything else as-is. We also need to generate SSH keypair for deployer user, but we'll come back to that when setting up CI/CD.
Now, it's time to install Node
We are going to install Node and PM2 under "deployer" user, so need to become that with.
sudo su deployerYou'll end up in your management user home folder as deployer. You can change to deployer home user writing cd that will take you to current user home (which is deployer).
First we need to install Node Version Manager to install Node.
curl -o- https://raw.githubusercontent.com/nvm-sh/nvm/v0.39.5/install.sh | bashThis will install nvm. To run it, we first need to reload bash env, with source ~/.bashrc or log out of server and log back in. Easier to just reload.
After that we can check if nvm was installed correctly running nvm --version
deployer@astro-example-project:~$ nvm --version
0.39.5
We are going to install Node 20, but you can instal any Node version with nvm install NODE_VERSION
nvm install 20After installation we can confirm Node was installed running node -v and npm -v (NPM is Node Package Manaager, needed for Astro).
Now, we also need to install PM2. PM2 is required to keep Astro running when we terminate our SSH connection to server. There are also other easier Linux built-in options, like screen, tmux etc, but PM2 is specially built for Node and has quite some goodies out of box: clustering, monitoring, auto-restarting, memory management, logging etc.
npm install pm2 -gWe'll use NPM to install PM2 with -g flag to make it globally accessible. Can verify it's installation with pm2 --version
Now, on server everything should be there to run Astro. We can continue to Gitlab CI/CD setup.
We have example Astro project with SSR (Server Side Rendering) enabled in https://gitlab.com/McSneaky/astro-example, going to add CI for that.
Gitlab CI/CD setup
Since CI/CD pipeline makes SSH connection to server, we need to comment out small part in ~/.bashrc in deployer user and make SSH keypair for deployer.
As deployer open ~/.bashrc with any editor and somewhere on top of there comment out this section (if exists).
case $- in
    *i*) ;;
      *) return;;
esac

# becomes

#case $- in
#    *i*) ;;
#      *) return;;
#esac
Since deployer SSH keypair is needed in Gitlab CI, we'll start adding that key to deployer.
As deployer user need to run ssh-keygen -t rsa, to generate keypair. We can leave all settings it asks as default.
deployer@astro-example-project:~$ ssh-keygen -t rsa
Generating public/private rsa key pair.
Enter file in which to save the key (/home/deployer/.ssh/id_rsa):
Created directory '/home/deployer/.ssh'.
Enter passphrase (empty for no passphrase):
Enter same passphrase again:
Your identification has been saved in /home/deployer/.ssh/id_rsa
Your public key has been saved in /home/deployer/.ssh/id_rsa.pub
Now, we also need to add generated public key to authorized_keys
That can be done with just copying new public key cp ~/.ssh/id_rsa.pub ~/.ssh/authorized_keys
Also, we need to make Gitlab aware of that new key. For that need to copy contents of id_rsa private key and paste it as it to Gitlab as runner secret.
cat /home/deployer/.ssh/id_rsaIn Gitlab go to Settings -> CI/CD
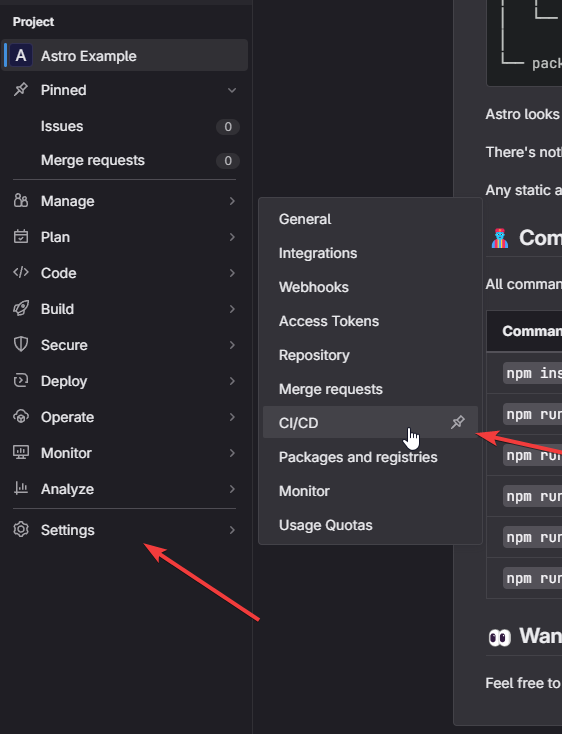
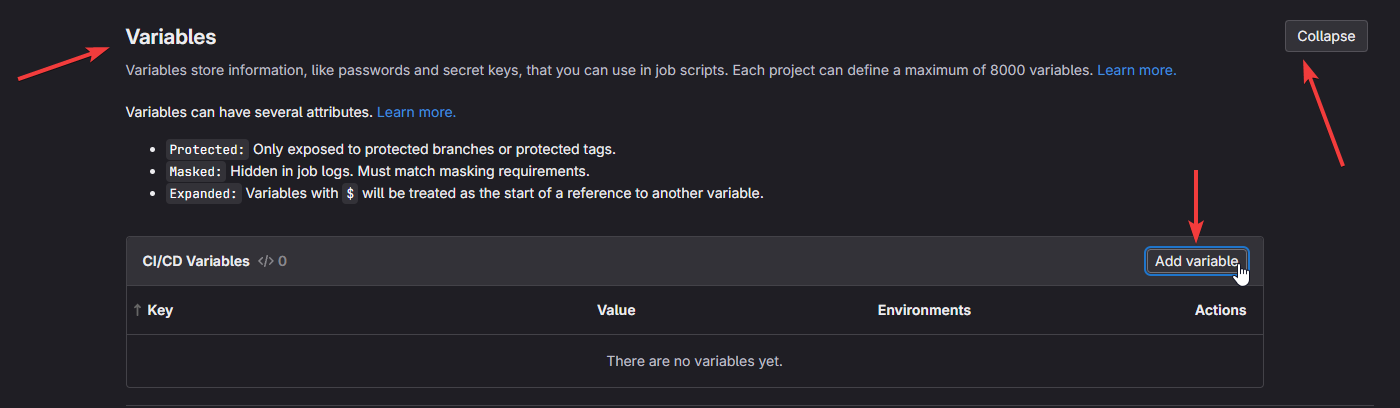
Variables -> Expand and then "Add Variable"
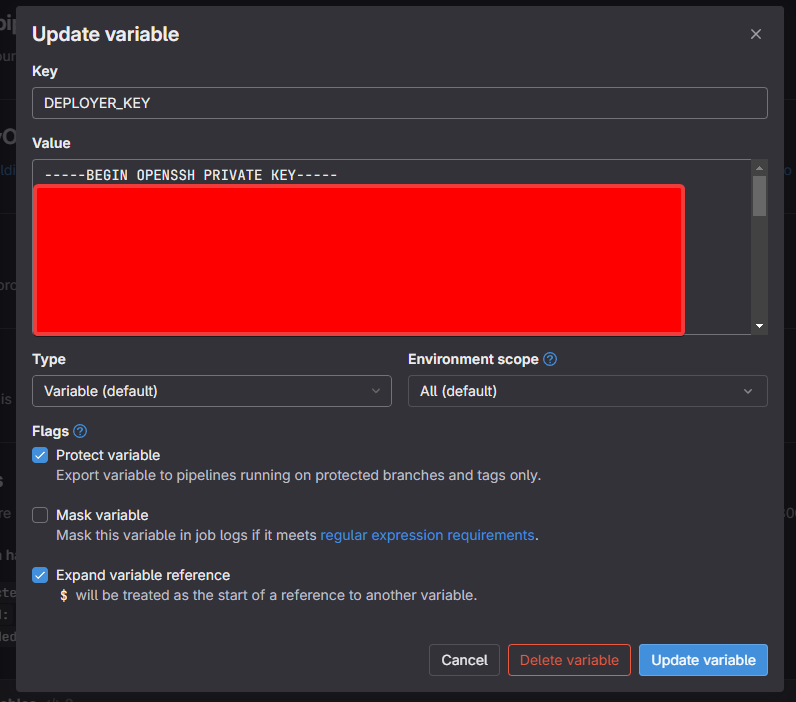
Name variable as "DEPLOYER_KEY" and paste contents of your `/home/deployer/.ssh/id_rsa` file as value. This time we are copying over private key, since Gitlab needs to use it to SSH to your server.
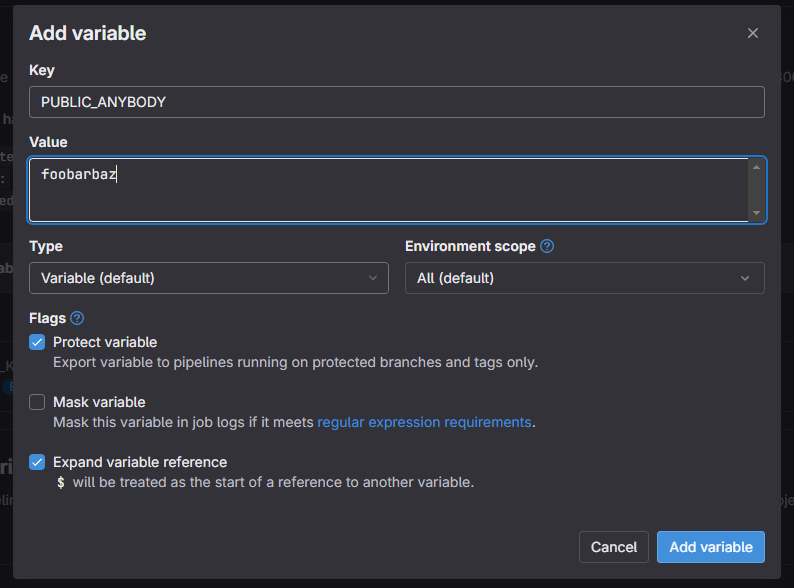
Let's also add one more variable, just to showcase how to pass them to Astro later on
Now most setup is done. Next need to create Gitlab CI config file. That's going to be .gitlab-ci.yml at the root of the project, with contents like this:
variables:
  SERVER_IP: "167.172.40.24" # Replace with your own server IP
  PROJECT_NAME: "astro-example" # Replace with your own project name

stages:
  - deploy

deploy:
  stage: deploy
  # Use this as base image to get small SSH container
  image: instrumentisto/rsync-ssh
  only:
    # Run deploy step only on pushes to "master"
    - master

  # Setup SSH with $DEPLOYER_KEY
  before_script:
    - 'command -v ssh-agent >/dev/null || ( apk add --update openssh )'
    - eval $(ssh-agent -s)
    - echo "$DEPLOYER_KEY" | tr -d '\r' | ssh-add -
    - mkdir -p ~/.ssh
    - chmod 700 ~/.ssh
    - ssh-keyscan ${SERVER_IP} >> ~/.ssh/known_hosts
    - chmod 644 ~/.ssh/known_hosts

  script:
    # SSH to server, pull or clone latest changes from primary branch, cd into it, install packages, build and tell PM2 to restart or start Astro
    # Those "clone or pull" and "restart or start" are needed for initial deployment on fresh server
    # Also passing PUBLIC_ANYBODY to Astro
    - ssh -t deployer@${SERVER_IP} "
      git -C ${PROJECT_NAME} pull https://gitlab-ci-token:${CI_JOB_TOKEN}@gitlab.com/${CI_PROJECT_PATH} || git clone https://gitlab-ci-token:${CI_JOB_TOKEN}@gitlab.com/${CI_PROJECT_PATH} &&
      cd ${PROJECT_NAME} &&
      npm ci &&
      PUBLIC_ANYBODY=${PUBLIC_ANYBODY} npm run build &&
      ASTRO_SECRET_PASSWORD=secret-server-stuff pm2 restart ${PROJECT_NAME} --update-env ||
      ASTRO_SECRET_PASSWORD=secret-server-stuff pm2 start --name ${PROJECT_NAME} dist/server/entry.mjs
      "
Now when push is made, it will autodeploy to your server. You can also pass additional arguments to PM2. For example if want to limit memory, then can add --max-memory-restart 300M to last line. Making it like this: pm2 start --name ${PROJECT_NAME} dist/server/entry.mjs
Running pm2 ps on server, we can see, that it's running.

We can check logs with pm2 logs astro-example and monitor it it's resource usages etc with pm2 monit
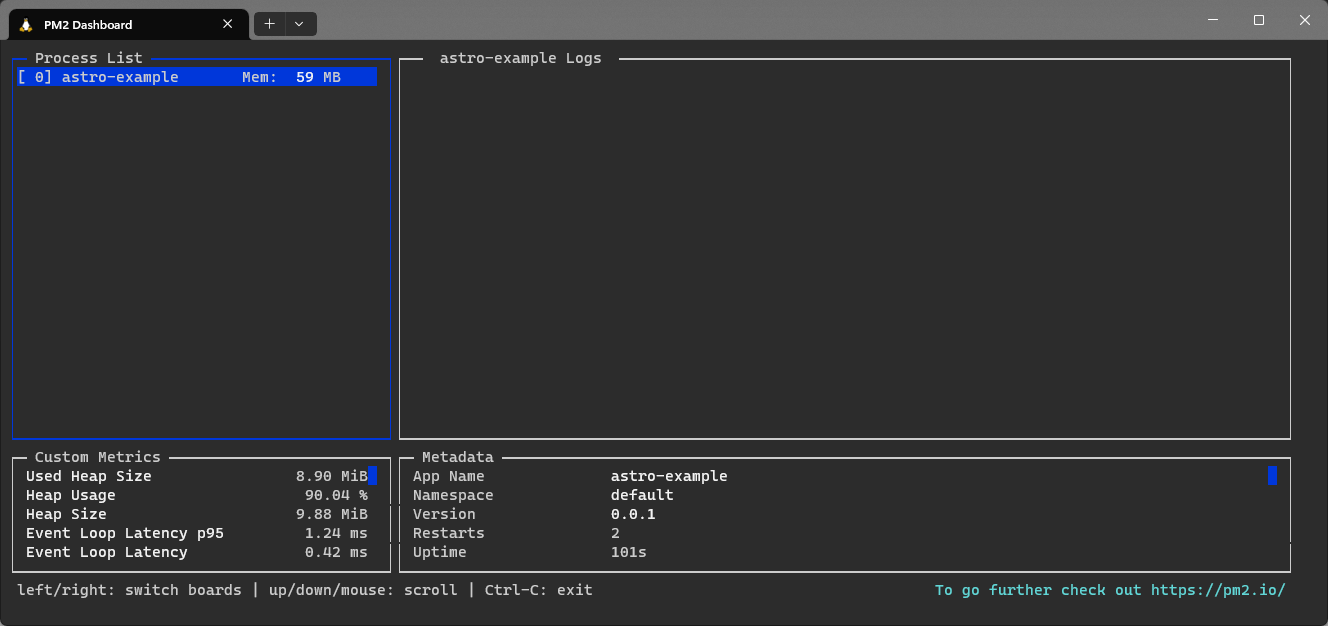
Checking logs with pm2 logs astro-example we can see, that Astro is running on 127.0.0.1:4321
0|astro-ex | 07:22:47 PM [@astrojs/node] Server listening on http://127.0.0.1:4321It's listening for traffic on local machine only. To get SSL cert and make our site public, we are going to use Caddy as reverse proxy.
Setting up Caddy
Caddy setup is rather simple. First we need to install it. They have nice tutorial in here: https://caddyserver.com/docs/install#debian-ubuntu-raspbian
As copy paste from there, those are the commands we need to run:
(Since they require sudo we need to exit deployer user with just exit).
sudo apt install -y debian-keyring debian-archive-keyring apt-transport-https
curl -1sLf 'https://dl.cloudsmith.io/public/caddy/stable/gpg.key' | sudo gpg --dearmor -o /usr/share/keyrings/caddy-stable-archive-keyring.gpg
curl -1sLf 'https://dl.cloudsmith.io/public/caddy/stable/debian.deb.txt' | sudo tee /etc/apt/sources.list.d/caddy-stable.list
sudo apt update
sudo apt install caddyAfter Caddy has been sucessfully installed, would be really good to deamonize it. Meaning that it will autostart after server restarts, we can catch stdout/stderr etc .
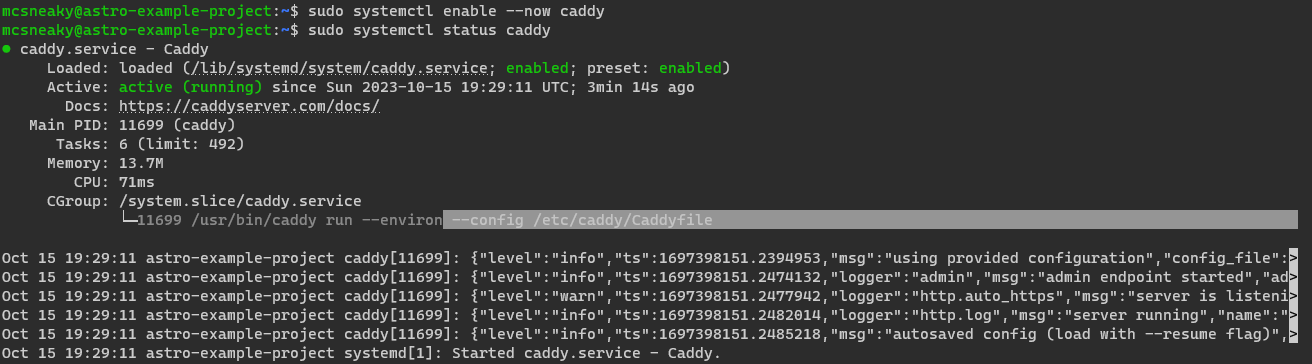
Luckily Caddy provides single liner for it: sudo systemctl enable --now caddy--now flag makes Caddy start up instantly too after enableing it.
We can check it's status with sudo systemctl status caddy. Should see nice Active: active (running) in there.
From the same output can also see where is Caddy config file located: /etc/caddy/Caddyfile
Now going to your server IP in browser should see Caddy default page. That means everything is working fine.

We really don't want to see that default page tho, we want to see our Astro page. Need to config Caddy to reverse proxy to it editing it's config file.
If you have domain, then it's better to point domain to server before changing Caddy conf. Since Caddy will try to get valid SSL certificate when it's config changes, but if domains is not yet pointed, it might cause some annoyances. Point A record to server.

Inside Caddyfile we can remove everything that's in there, or comment out prefixing # at the start of lines.
Only thing we need to add is this:
i-want-domain.website { # Domain name we have
  reverse_proxy localhost:4321 # Proxy it to Astro
}
After that, can reload Caddy conf with sudo systemctl reload caddy
Give it some seconds or some tens of seconds to get SSL certificate and you should have your Astro site up and running on your domain.
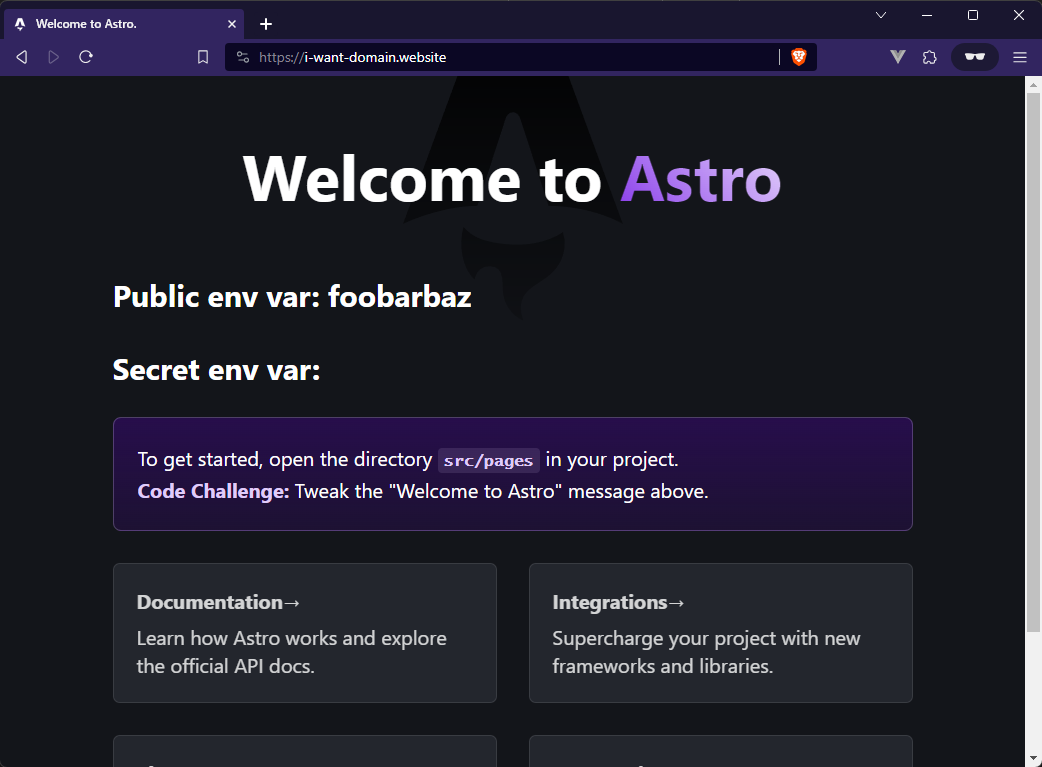
Env variables can be either public or secret. Public ones are visible on frontend, like on image above, secrets ones are kept in backend only.
Public ones can be made by prefixing variable with PUBLIC_. Like this "foobarbaz" which is PUBLIC_ANYBODY we defined in gitlab-ci.yml file. It's usable on client side (browser) importing it from meta env import.meta.env.PUBLIC_ANYBODY
Whole that HTML line:
<h2>Public env var: { import.meta.env.PUBLIC_ANYBODY }</h2>Secret variables, like database passwords, API keys etc are kept in server only and are predixed with ASTRO_SECRET_. imported the same way from meta env import.meta.env.ASTRO_SECRET_PASSWORD. Even tho it's set to "secret-server-stuff" in CI file, it's not visible in screenshot.
Source code is available here: https://gitlab.com/McSneaky/astro-example